The Xbox 360 reset glitch hack
tmbinc said it himself, software based approaches of running unsigned code on the 360 mostly don't work, it was designed to be secure from a software point of view.
The processor starts running code from ROM (1bl) , which then starts loading a RSA signed and RC4 crypted piece of code from NAND (CB).
CB then initialises the processor security engine, its task will be to do real time encryption and hash check of physical DRAM memory. From what we found, it's using AES128 for crypto and strong (Toeplitz ?) hashing. The crypto is different each boot because it is seeded at least from:
- A hash of the entire fuseset.
- The timebase counter value.
- A truly random value that comes from the hardware random number generator the processor embeds. on fats, that RNG could be electronically deactivated, but there's a check for "apparent randomness" (merely a count of 1 bits) in CB, it just waits for a seemingly proper random number.
CB can then run some kind of simple bytecode based software engine whose task will mainly be to initialise DRAM, CB can then load the next bootloader (CD) from NAND into it, and run it.
Basically, CD will load a base kernel from NAND, patch it and run it.
That kernel contains a small privileged piece of code (hypervisor), when the console runs, this is the only code that would have enough rights to run unsigned code. In kernel versions 4532/4548, a critical flaw in it appeared, and all known 360 hacks needed to run one of those kernels and exploit that flaw to run unsigned code. On current 360s, CD contains a hash of those 2 kernels and will stop the boot process if you try to load them. The hypervisor is a relatively small piece of code to check for flaws and apparently no newer ones has any flaws that could allow running unsigned code.
On the other hand, tmbinc said the 360 wasn't designed to withstand certain hardware attacks such as the timing attack and "glitching".
Glitching here is basically the process of triggering processor bugs by electronical means.
This is the way we used to be able to run unsigned code.
The reset glitch in a few words
We found that by sending a tiny reset pulse to the processor while it is slowed down does not reset it but instead changes the way the code runs, it seems it's very efficient at making bootloaders memcmp functions always return "no differences". memcmp is often used to check the next bootloader SHA hash against a stored one, allowing it to run if they are the same. So we can put a bootloader that would fail hash check in NAND, glitch the previous one and that bootloader will run, allowing almost any code to run.
Details for the fat hack
On fats, the bootloader we glitch is CB, so we can run the CD we want.
cjak found that by asserting the CPU_PLL_BYPASS signal, the CPU clock is slowed down a lot, there's a test point on the motherboard that's a fraction of CPU speed, it's 200Mhz when the dash runs, 66.6Mhz when the console boots, and 520Khz when that signal is asserted.
So it goes like that:
- We assert CPU_PLL_BYPASS around POST code 36 (hex).
- We wait for POST 39 start (POST 39 is the memcmp between stored hash and image hash), and start a counter.
- When that counter has reached a precise value (it's often around 62% of entire POST 39 length), we send a 100ns pulse on CPU_RESET.
- We wait some time and then we deassert CPU_PLL_BYPASS.
- The cpu speed goes back to normal, and with a bit of luck, instead of getting POST error AD, the boot process continues and CB runs our custom CD.
The NAND contains a zero-paired CB, our payload in a custom CD, and a modified SMC image. A glitch being unreliable by nature, we use a modified SMC image that reboots infinitely (ie stock images reboot 5 times and then go RROD) until the console has booted properly. In most cases, the glitch succeeds in less than 30 seconds from power on that way.
Details for the slim hack
The bootloader we glitch is CB_A, so we can run the CB_B we want.
On slims, we weren't able to find a motherboard track for CPU_PLL_BYPASS. Our first idea was to remove the 27Mhz master 360 crystal and generate our own clock instead but it was a difficult modification and it didn't yield good results. We then looked for other ways to slow the CPU clock down and found that the HANA chip had configurable PLL registers for the 100Mhz clock that feeds CPU and GPU differential pairs. Apparently those registers are written by the SMC through an I2C bus. I2C bus can be freely accessed, it's even available on a header (J2C3). So the HANA chip will now become our weapon of choice to slow the CPU down (sorry tmbinc, you can't always be right, it isn't boring and it does sit on an interesting bus ;)
So it goes like that:
- We send an i2c command to the HANA to slow down the CPU at POST code D8 .
- We wait for POST DA start (POST DA is the memcmp between stored hash and image hash), and start a counter.
- When that counter has reached a precise value, we send a 20ns pulse on CPU_RESET.
- We wait some time and then we send an i2c command to the HANA to restore regular CPU clock.
- The cpu speed goes back to normal, and with a bit of luck, instead of getting POST error F2, the boot process continues and CB_A runs our custom CB_B.
When CB_B starts, DRAM isn't initialised so we chose to only apply a few patches to it so that it can run any CD, the patches are:
- Always activate zero-paired mode, so that we can use a modified SMC image.
- Don't decrypt CD, instead expect a plaintext CD in NAND.
- Don't stop the boot process if CD hash isn't good.
CB_B is RC4 crypted, the key comes from the CPU key, so how do we patch CB_B without knowing the CPU key? RC4 is basically:
- crypted = plaintext xor pseudo-random-keystream
So if we know plaintext and crypted, we can get the keystream, and with the keystream, we can encrypt our own code. It goes like that:
- guessed-pseudo-random-keystream = crypted xor plaintext
- new-crypted = guessed-pseudo-random-keystream xor plaintext-patch
You could think there's a chicken and egg problem, how did we get plaintext in the first place? Easy: we had plaintext CBs from fat consoles, and we thought the first few bytes of code would be the same as the new CB_B, so we could encrypt a tiny piece of code to dump the CPU key and decrypt CB_B!
The NAND contains CB_A, a patched CB_B, our payload in a custom plaintext CD, and a modified SMC image. The SMC image is modified to have infinite reboot, and to prevent it from periodically sending I2C commands while we send ours.
Now, maybe you haven't realised yet, but CB_A contains no checks on revocation fuses, so it's an unpatchable hack !
Caveats
Nothing is ever perfect, so there are a few caveats to that hack:
- Even in the glitch we found is pretty reliable (25% success rate per try on average), it can take up to a few minutes to boot to unsigned code.
- That success rate seems to depend on something like the hash of the modified bootloader we want to run (CD for fats and CB_B for slims).
- It requires precise and fast hardware to be able to send the reset pulse.
Our current implementation
We used a Xilinx CoolRunner II CPLD (xc2c64a) board, because it's fast, precise, updatable, cheap and can work with 2 different voltage levels at the same time. We use the 48Mhz standby clock from the 360 for the glitch counter. For the slim hack, the counter even runs at 96Mhz (incremented on rising and falling edges of clock) The cpld code is written in VHDL. We need it to be aware of the current POST code, our first implementations used the whole 8 bits POST port for this, but we are now able to detect the changes of only 1 POST bit, making wiring easier.
Finding the right timing
Getting memcmp POST length in ticks
First step is to know how long the memcmp POST will last while slowed down. No reset pulse should be sent for this. Using hardware that can read the POST bus and measure time in a precise way, measure the time between memcmp POST start and 'hash compare failed' final POST (eg on fats, between POST 39 and POST AD) with the next bootloader failing hash check.
An ARM7 based Olimex LPC-H2148 was used for this task.
It could look like that:
for(;;)
{
post = post_read();
if (post == prev_post) then continue;
if(post == MEMCMP_POST)
{
t_start = get_tick();
while( post_read() == MEMCMP_POST );
memcmp_post_length=get_tick()-t_start;
print(memcmp_post_length);
}
prev_post=post;
}
Make sure you note memcmp post length ;)
Using random timing over the full POST length
Now you need the hardware to send a reset pulse after a random amount of time in memcmp POST, but no more than previously found memcmp POST length.
It could look like that:
for(;;)
{
post = read_post();
if (post == prev_post) then continue;
if(post == MEMCMP_POST)
{
t_start = get_tick();
t_rand = rand() % MEMCMP_POST_LENGTH;
while( get_tick()< t_start+t_rand );
ppc_send_reset_pulse();
print(t_rand);
}
prev_post=post;
}
Using a hacked smc that reboots infinitely it will take a good amount of time, but it should end up glitching properly.
Make sure you note the timing that glitched ;)
Refining the timing, accounting for bell-like curve
So now we have one timing that glitches, but we don't know if it's really the 'sweet spot' or if we were just lucky. What needs to be done now is to get the timing of some more successes, I think it's safe to use a smaller random range around previously found glitch timing. my get_tick() function runs at 60Mhz, I found it was safe to make the range -+50 ticks around previously found glitch timing
It could look like that:
for(;;)
{
post = read_post();
if (post == prev_post) then continue;
if(post == MEMCMP_POST)
{
t_start = get_tick();
t_rand = PREV_GLITCH_TIMING - 50 + (rand() % 100);
while( get_tick()< t_start+t_rand );
ppc_send_reset_pulse();
print(t_rand);
}
prev_post=post;
}
You'll need the timing of at least 20-30 successes. Averaging those timings should give you the sweet spot (aka final timing), because empirically we found that success rate vs timing is a bell-like curve.
Make sure ... you got it ;)
PS: Those pseudo-code examples don't show the slowdown code for the sake of clarity.
Conclusion
We tried not to include any MS copyrighted code in the released hack tools. The purpose of this hack is to run Xell and other free software, I (GliGli) did NOT do it to promote piracy or anything related, I just want to be able to do whatever I want with the hardware I bought, including running my own native code on it.
HowTo (for slims)
Required Software and Hardware
Prerequisites
- Installed Xilinx Lab Tools
Software
- Python and Pyton Crypto
- Impact (from Xilinx Lab Tools)
- NandPro (>= v2.0e)
Hardware
- USB SPI Programmer to dump/flash the Xbox360's NAND
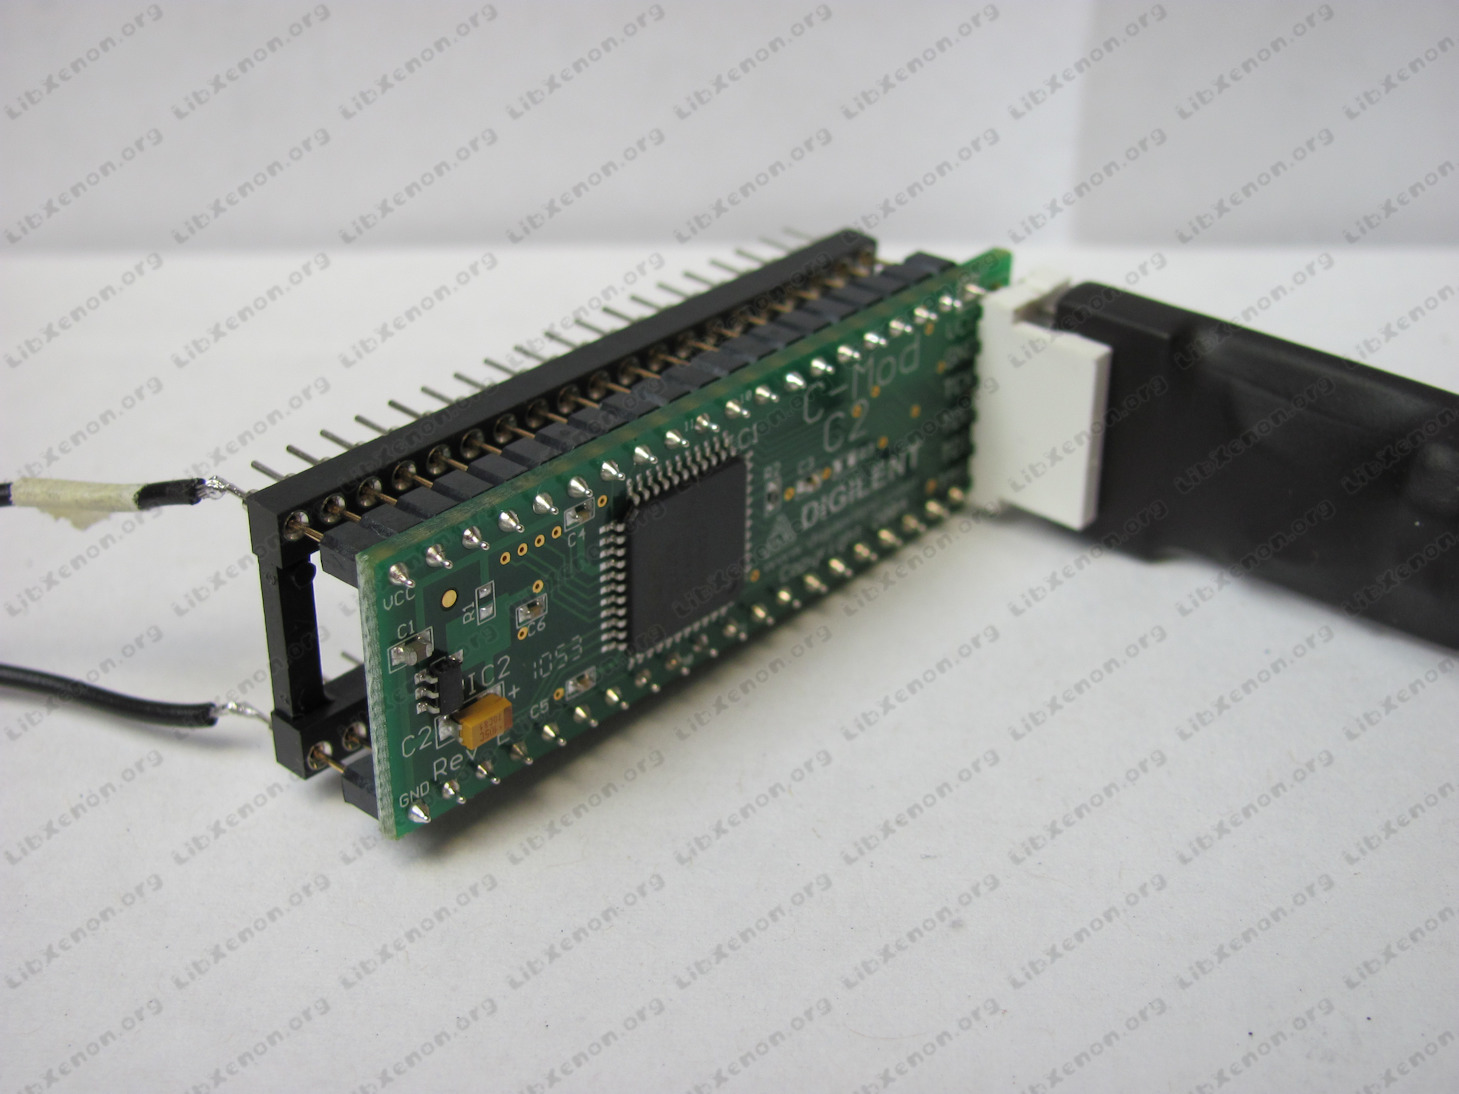
- XC2C64A CoolRunner-II CPLD (aka Digilent C-mod)
- Socket for the CPLD
- XilinX JTAG Programmer cable
- 1x 220pF capacitor
- Soldering material
Dumping NAND
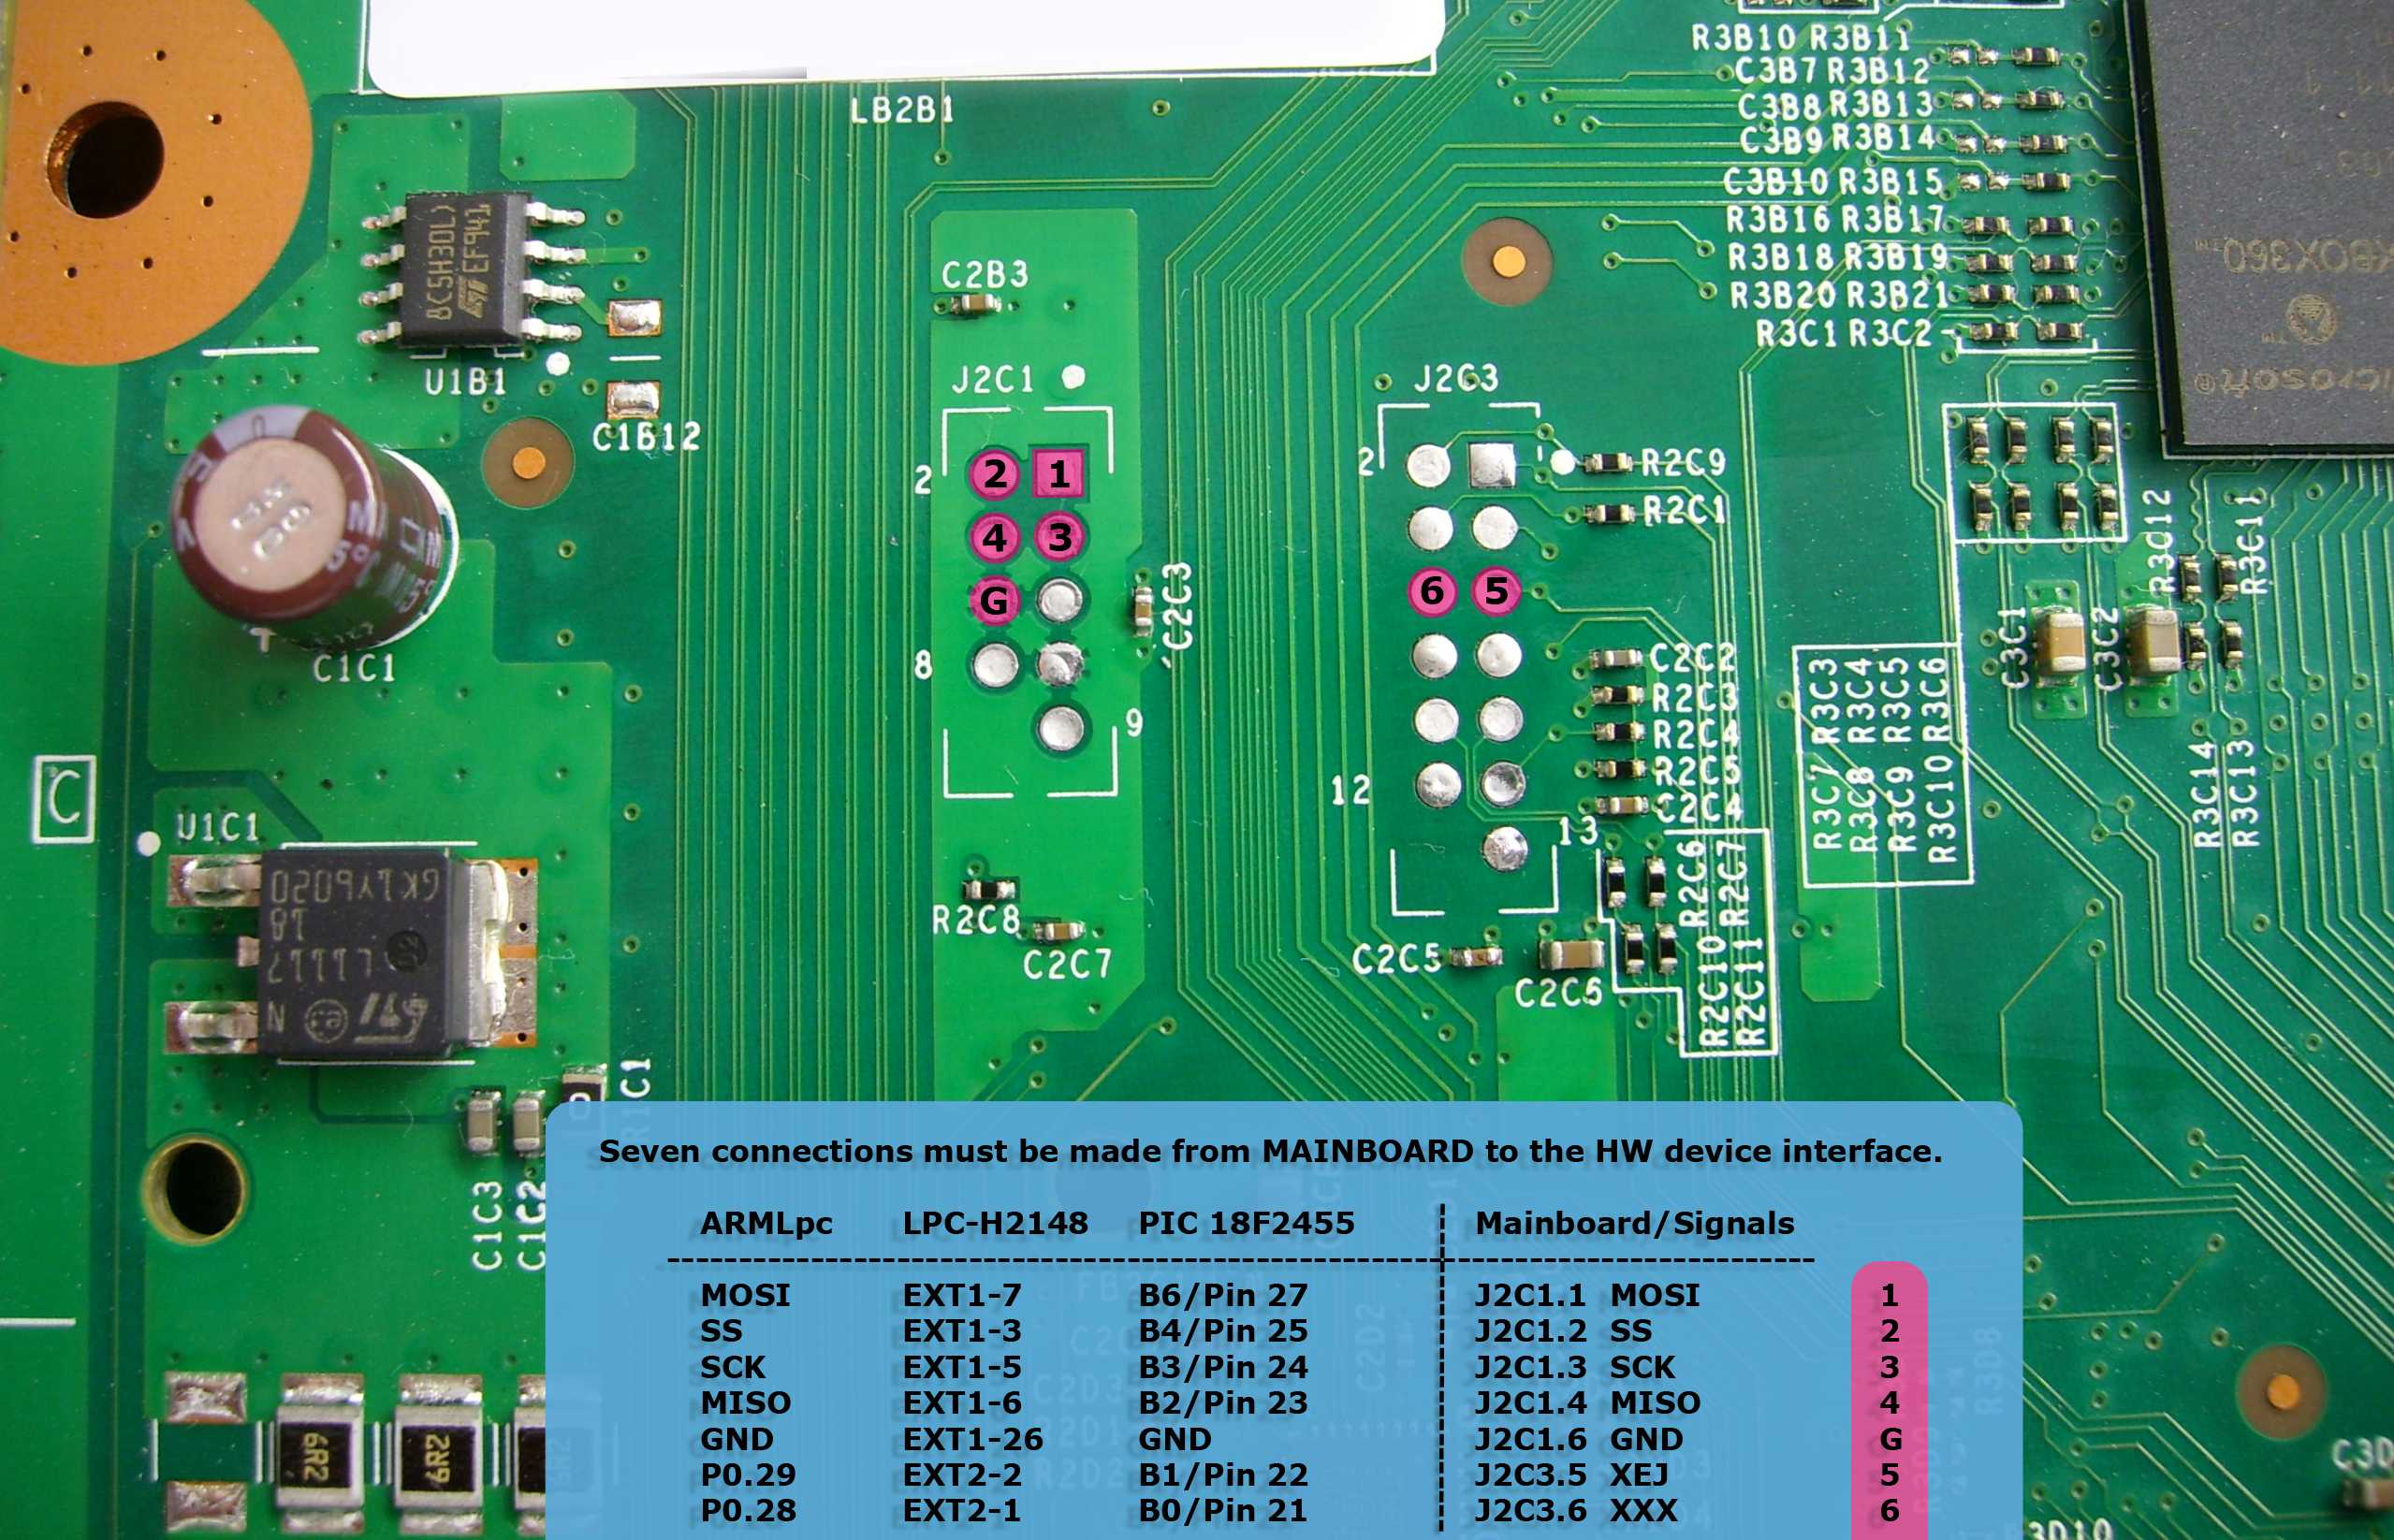
- Use the following diagram to solder your USB SPI Programmer to the Xbo360 motherboard.
- Open windows' command prompt and launch NandPro.
- Dump your nand twice by using the read command for 16MB NAND :
nandpro usb : -r16 nanddumpname.bin
- Compare the two dumps with the following command (you canuse MD5 Checksums too) :
fc /b nanddumpname.bin nanddumpname2.bin
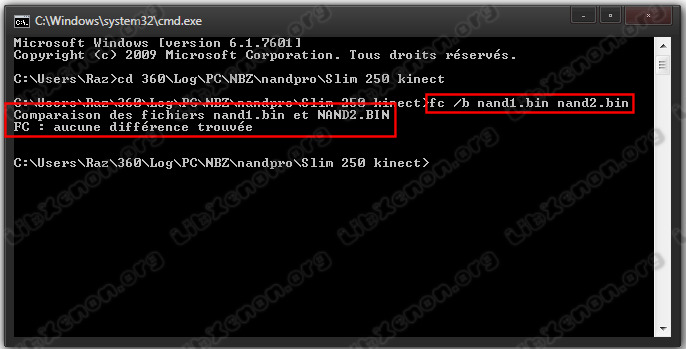
You should see something like FC : No difference found. If the two dumps don't match, do a new dump and check again.
Installation of Python and Python Crypto
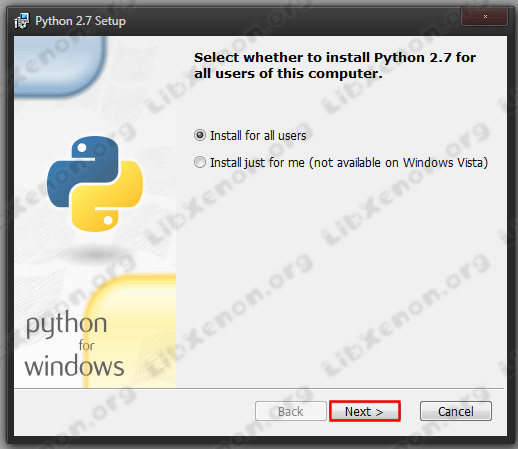
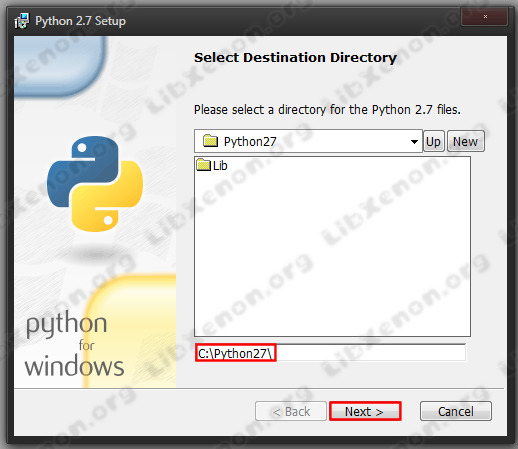
- Install Python 2.7 (32bit!) with the default settings :
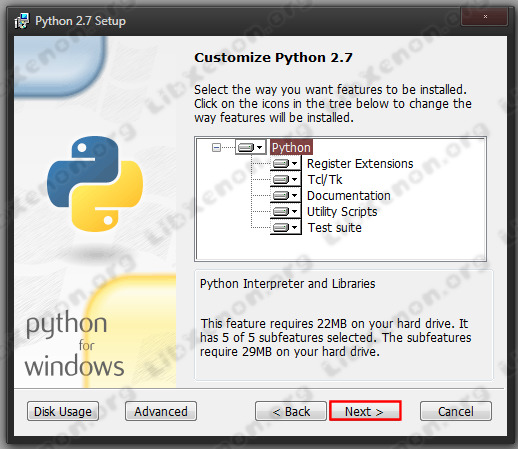
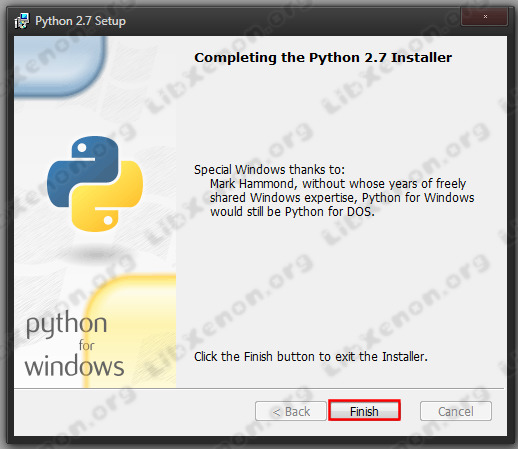
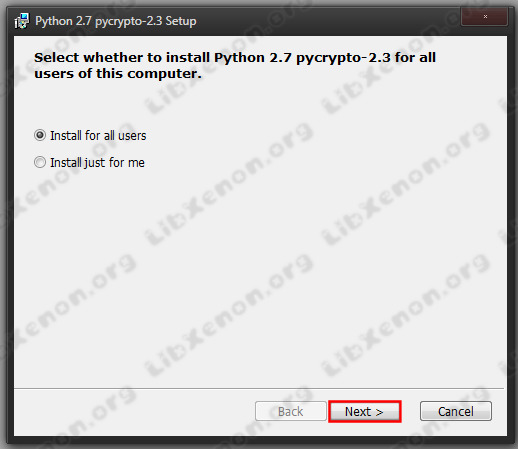
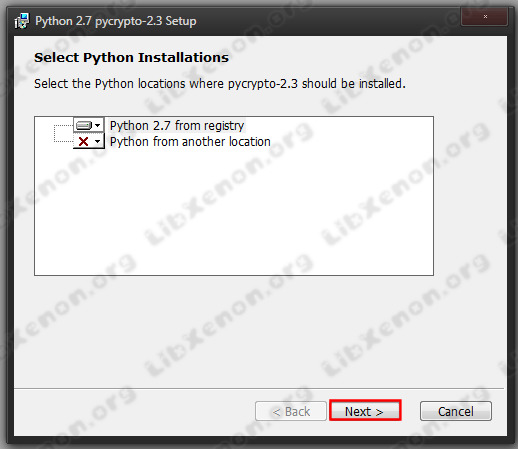
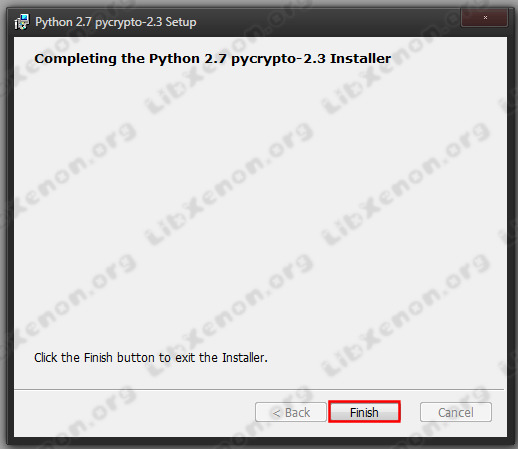
- Install PyCrypto 2.3 with the default settings :
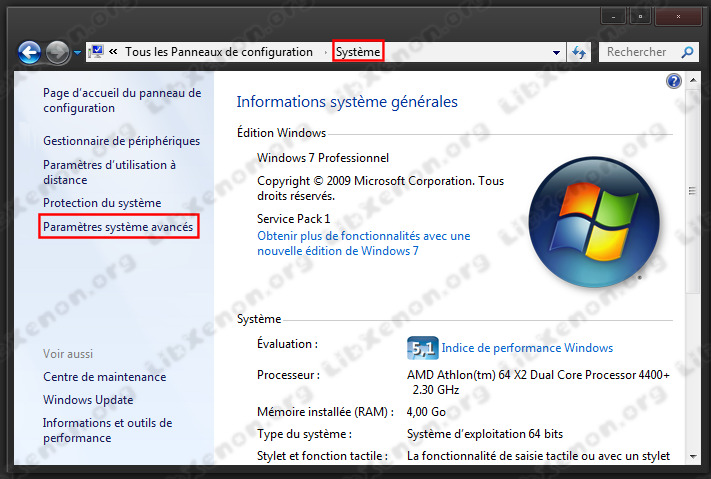
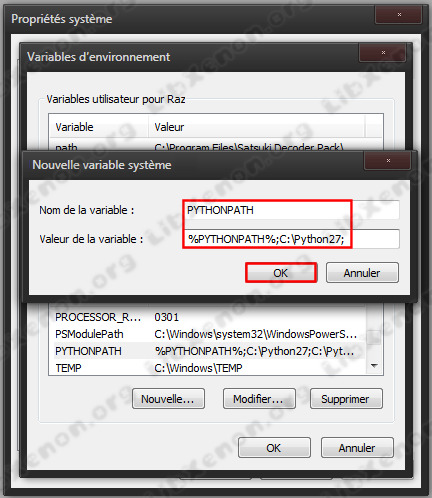
To enable python in windows' command prompt, we will have to modify the environment variables .
- Go in Control Panel > System > Advanced system settings
- Click on environnement variables
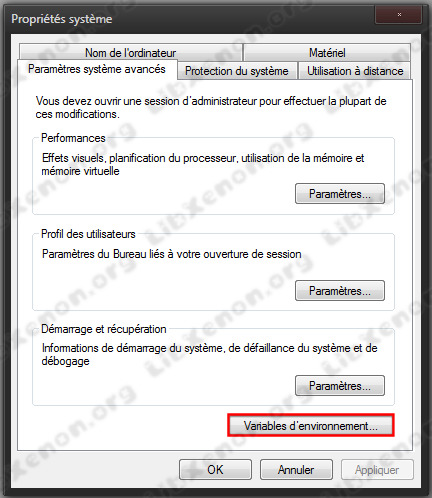
- Click on new in system variable
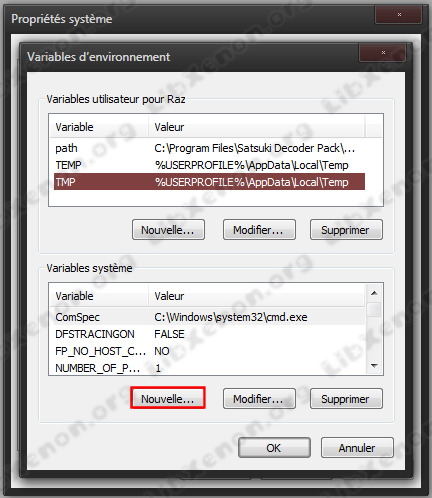
- Add this for the name and the value of the variable :
PYTHONPATH
%PYTHONPATH%;C:\Python2.7 ;
Creating the Hackimage
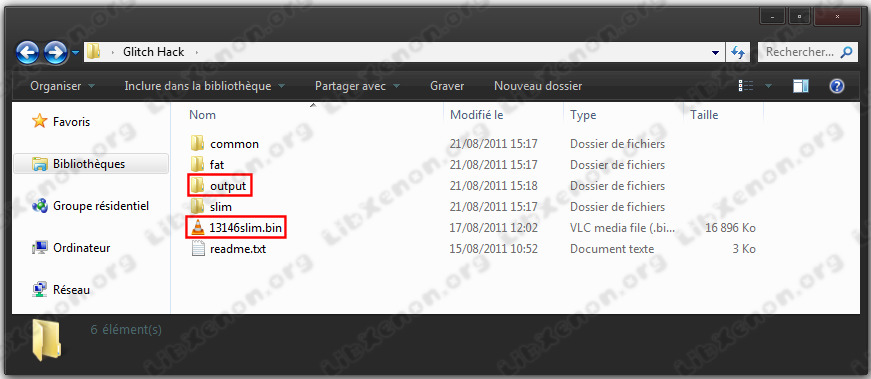
- Download the gggggg-hack (Free60-Git Repository).
- Put your original NAND dump in the root of the gggggg-folder and create an create a folder named "ouput" (in the root aswell).
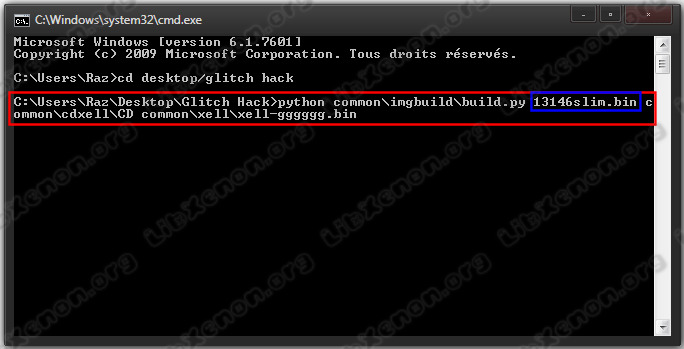
- Open windows' command prompt again and navigate to the gggggg-folder, then type this python command (don't forget to modify it with your NAND dump name) :
python common\imgbuild\build.py nanddumpname.bin common\cdxell\CD common\xell\xell-gggggg.bin
You should see the following
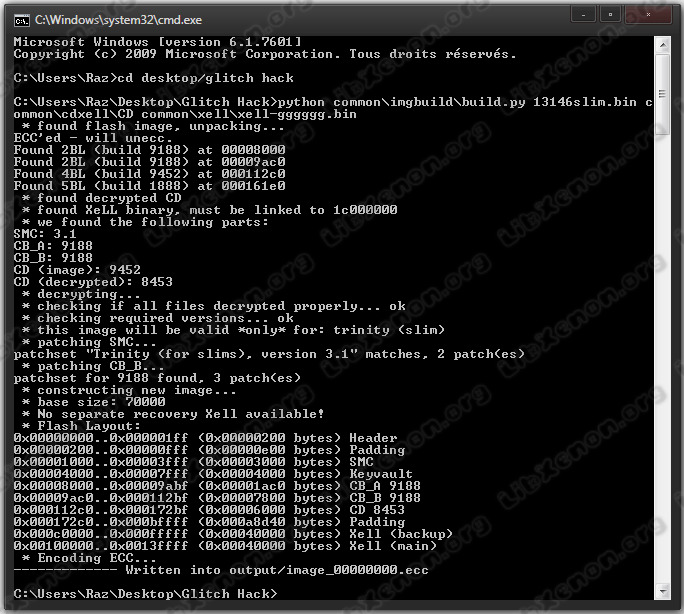
The file image_00000000.ecc is located in the output folder now.
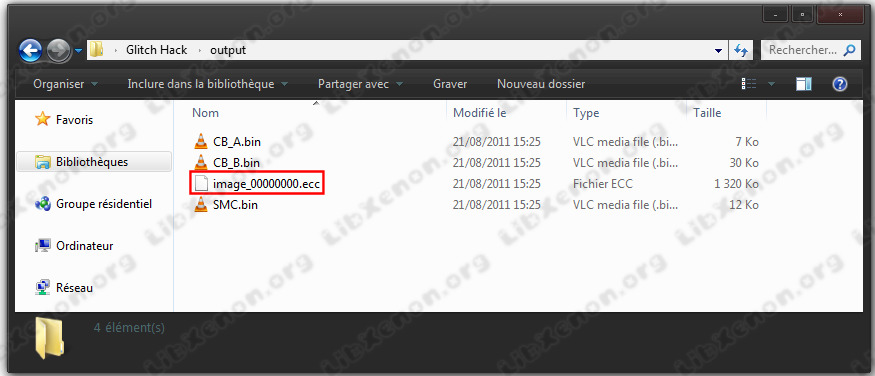
- Copy this file into your nandpro folder and navigate to the folder via commandprompt again
- Use the following command to flash the image to your console's NAND.
nandpro usb : +w16 image_00000000.ecc
/!\ Pay attention that you have to use the +w16 switch and not the -w16 one /!\
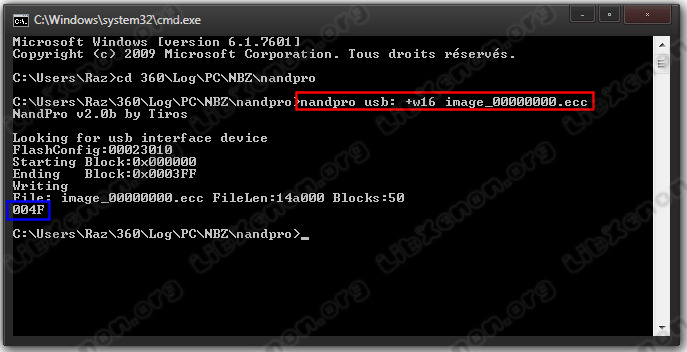
The flashed file has a size of 50 blocks so you should see 004F when the flashing is done.
Programming the CPLD
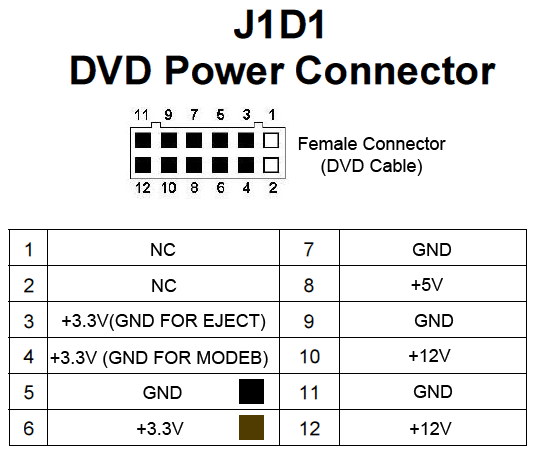
Power your CPLD with 3.3V on pin 20 and GND on pin 21. There are many solution to do this ... here are some of them :
- Use an old DVD drive supply cable by cutting 5 and 6 cable (3.3V and GND) and connect it to the a CK or the motherboard drive socket OR Solder the pin 20 to the J2C1.8 point of the motherboard and pin 21 (GND) to a point of the motherboard like the legs of the various connector-metalcasing.
- Grab your LPT/USB XilinX JTAG programmer cable. Connect the cable to the PC and the CPLD.
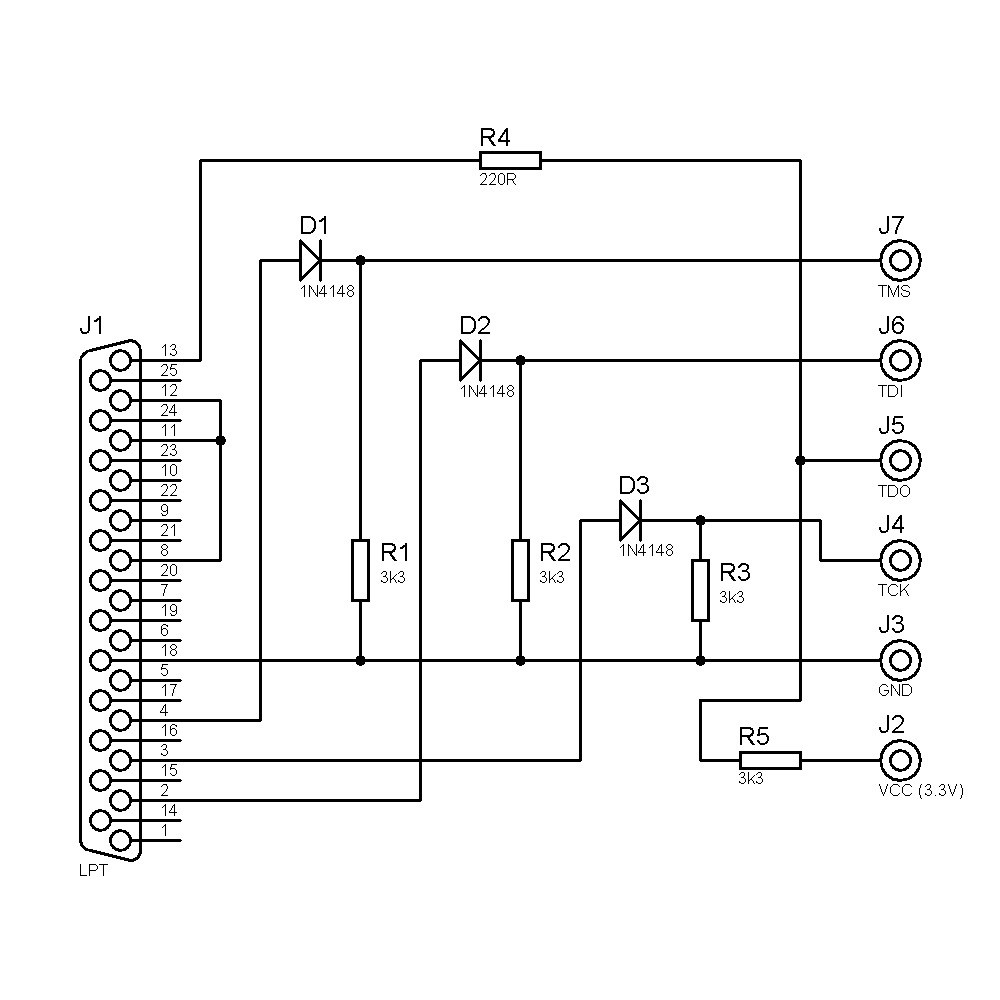
(If you don't have one, you can use GliGli's schematic to build a LPT JTAG Programmer)
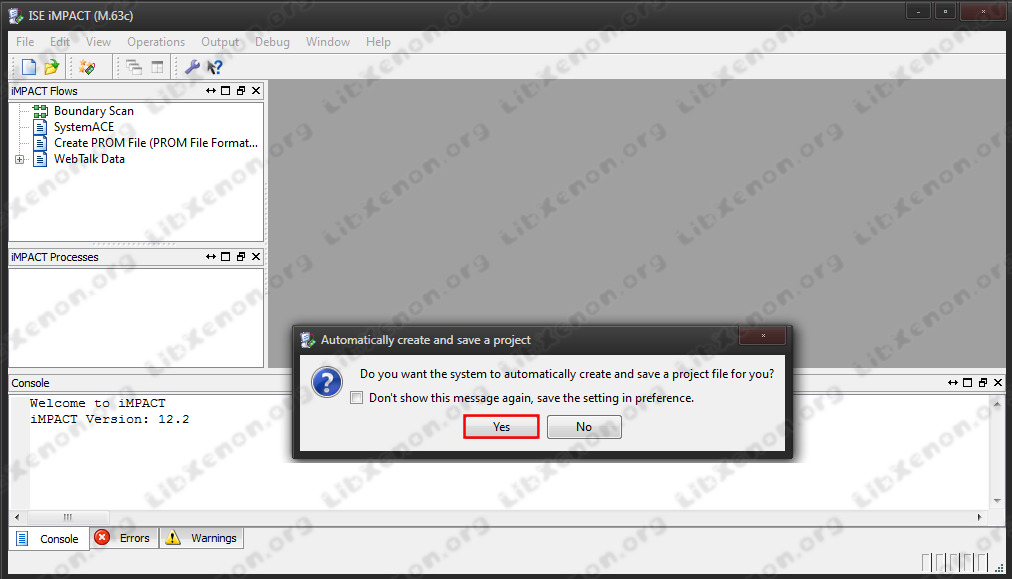
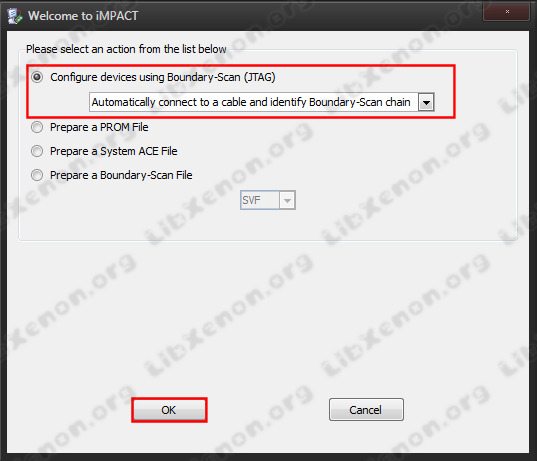
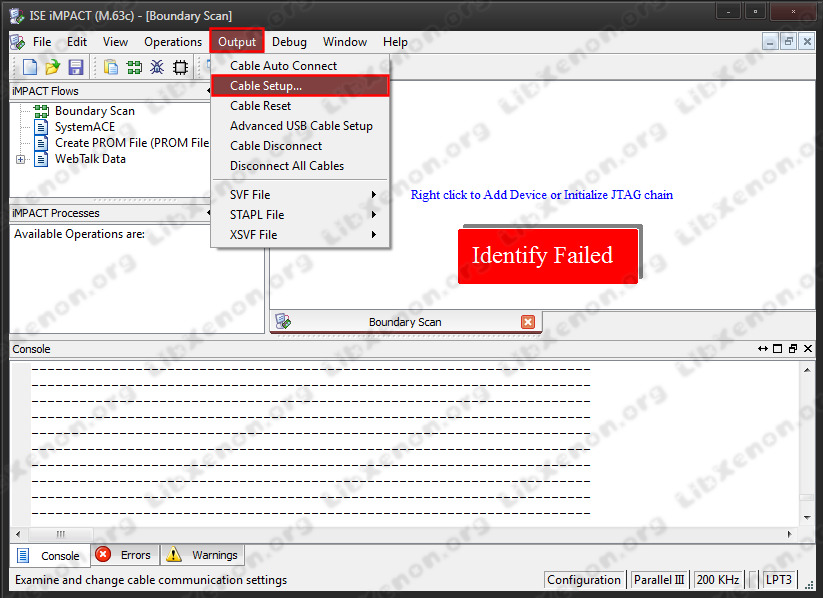
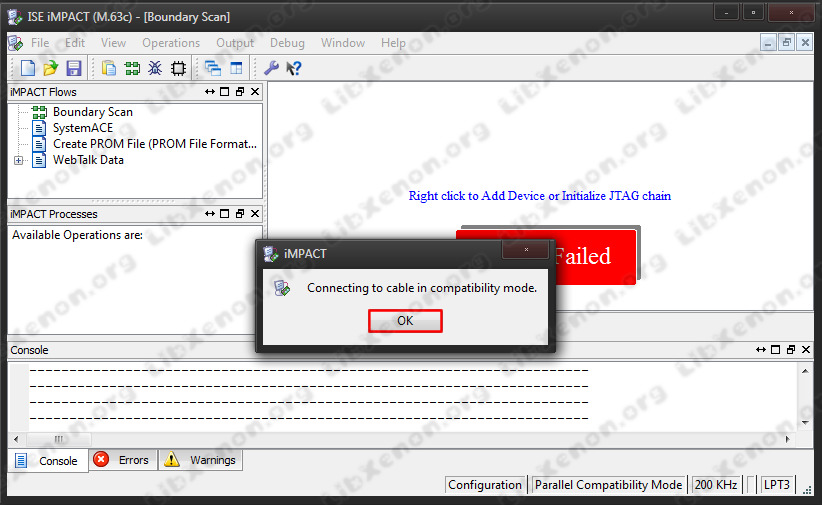
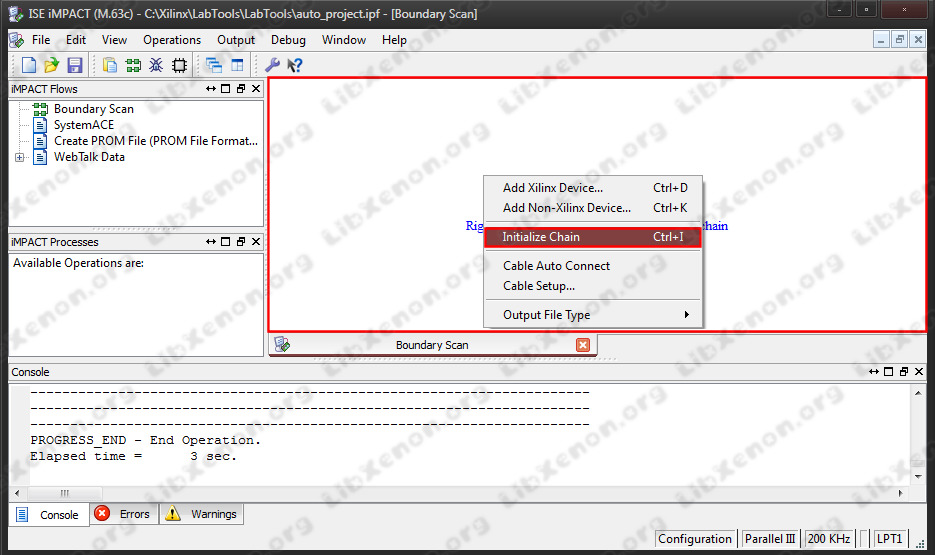
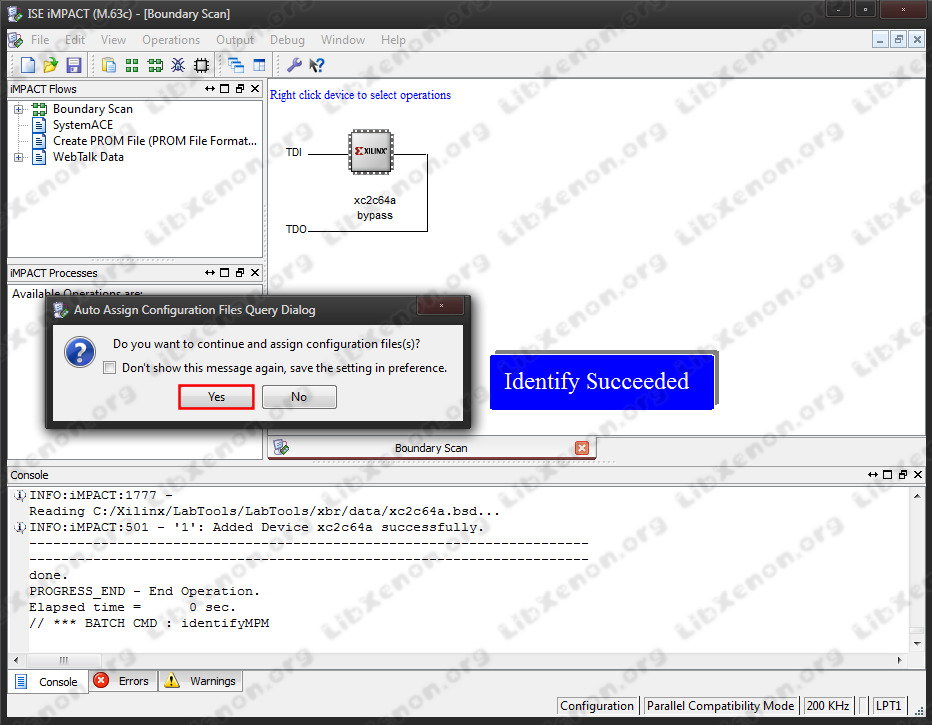
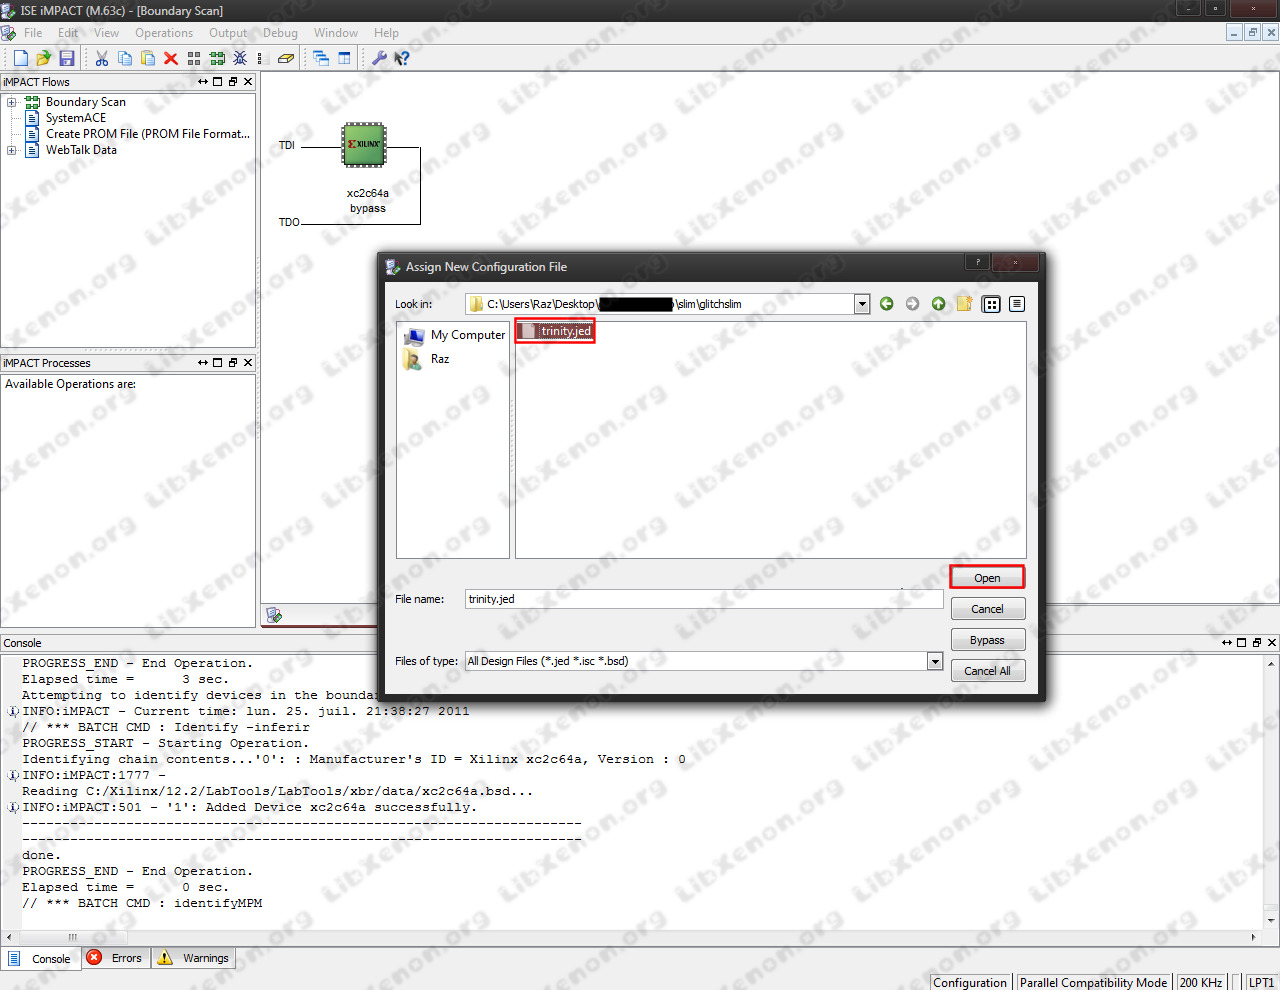
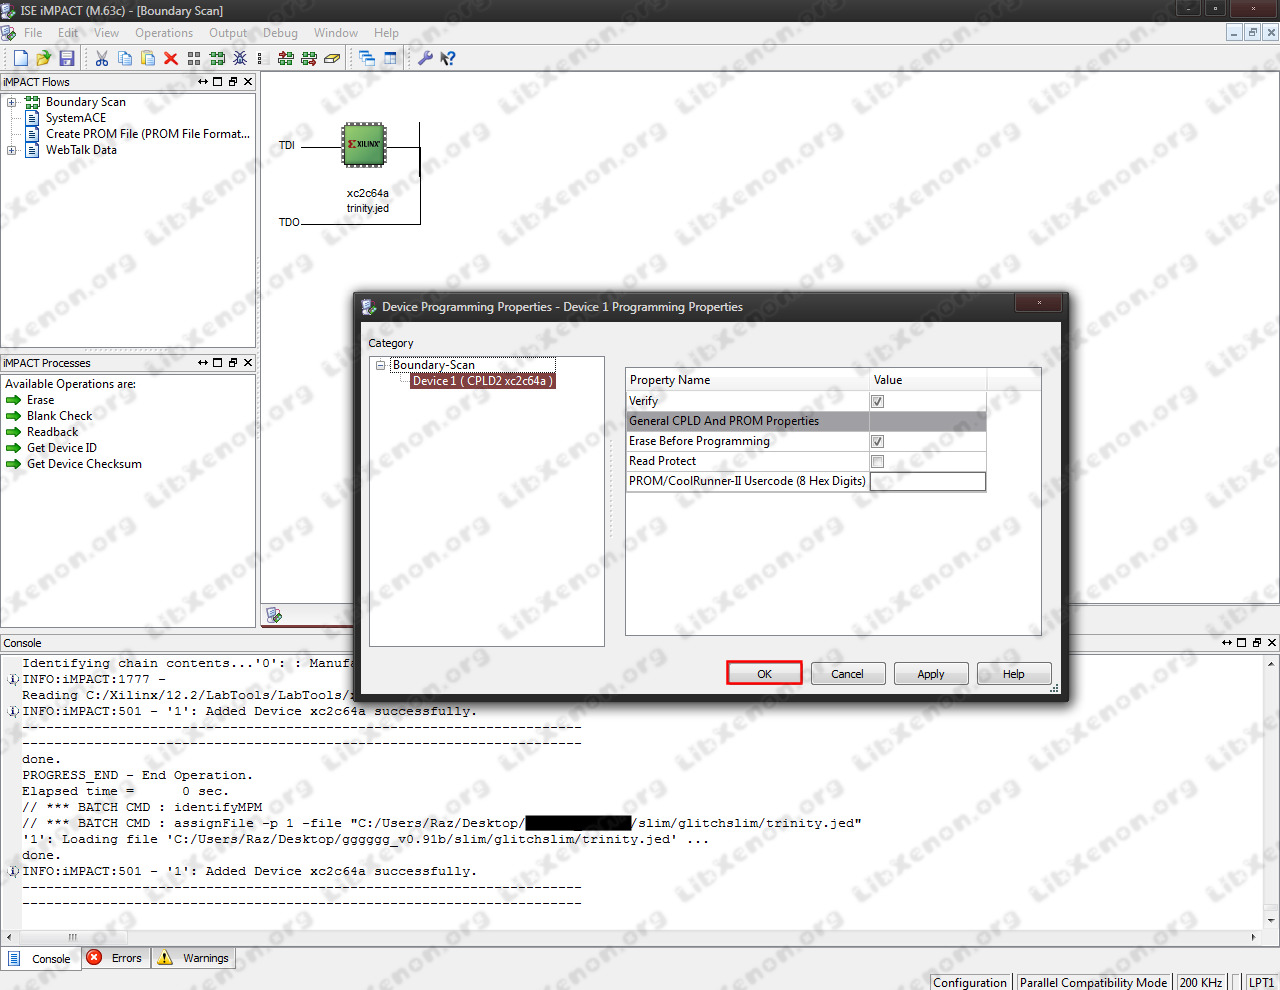
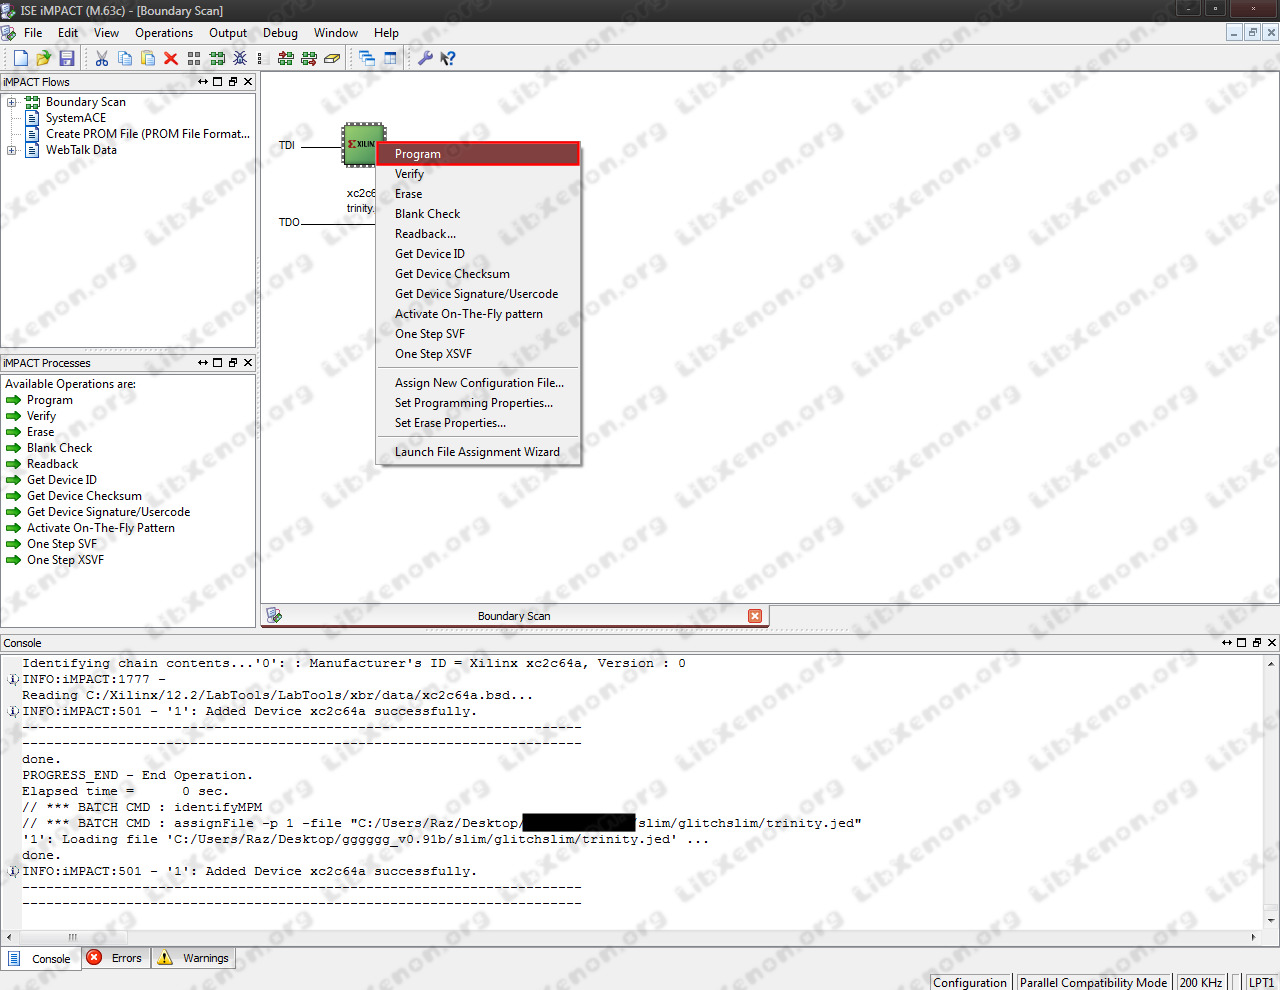
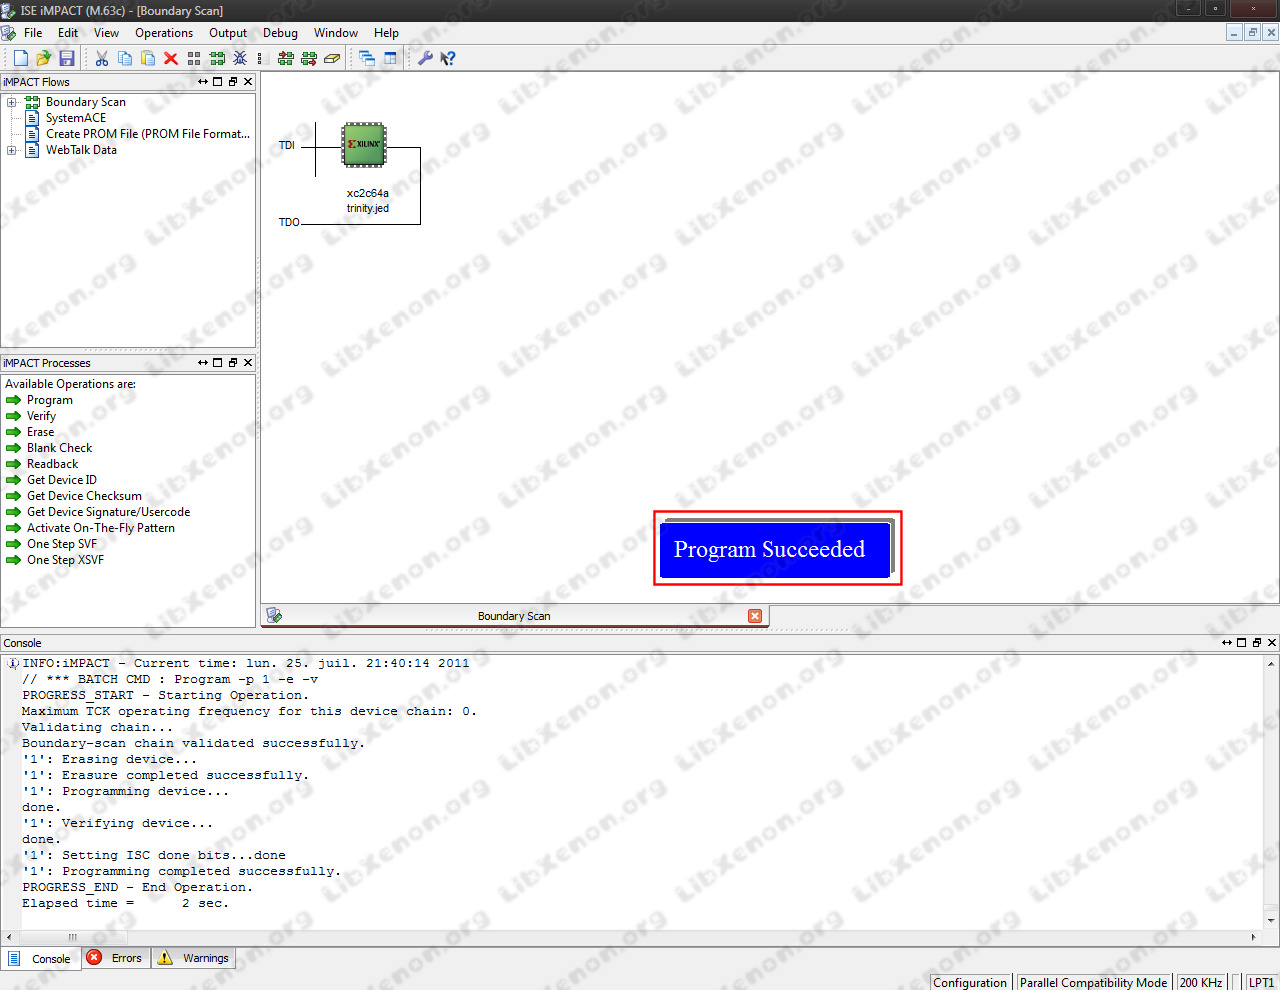
- Launch "iMPACT" (from XilinX Lab Tools) and let's start the programming ... just follow the images.
(You have to setup the compatibility mode only if your Programmer does not get detected right away)

Wiring
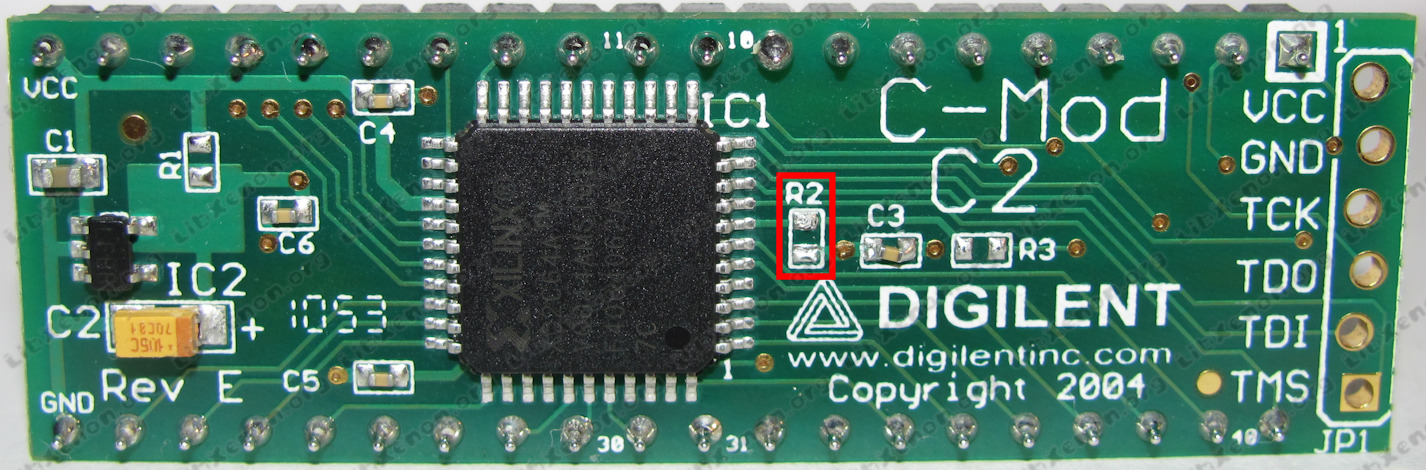
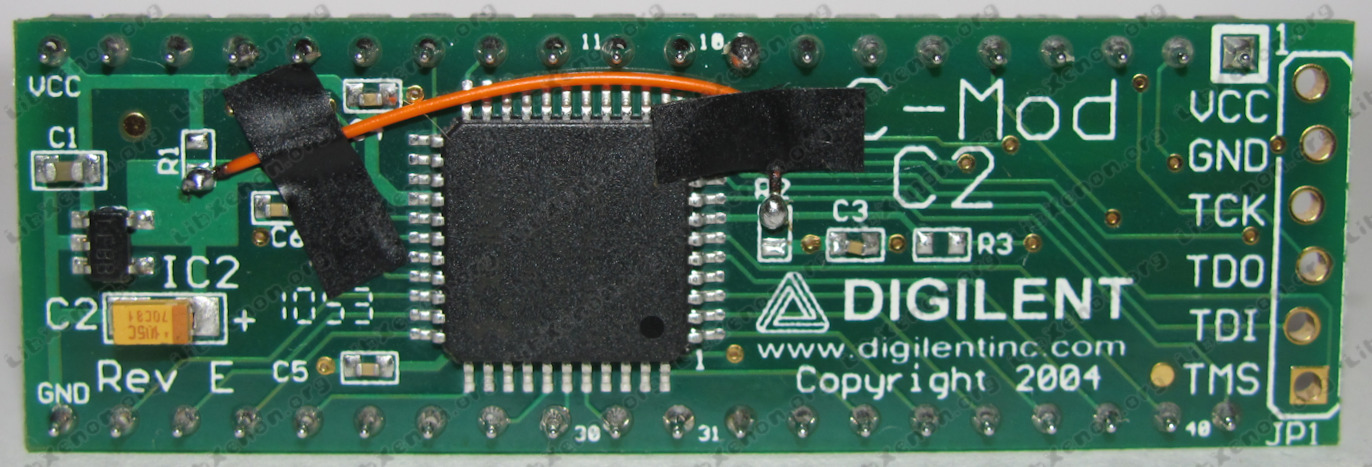
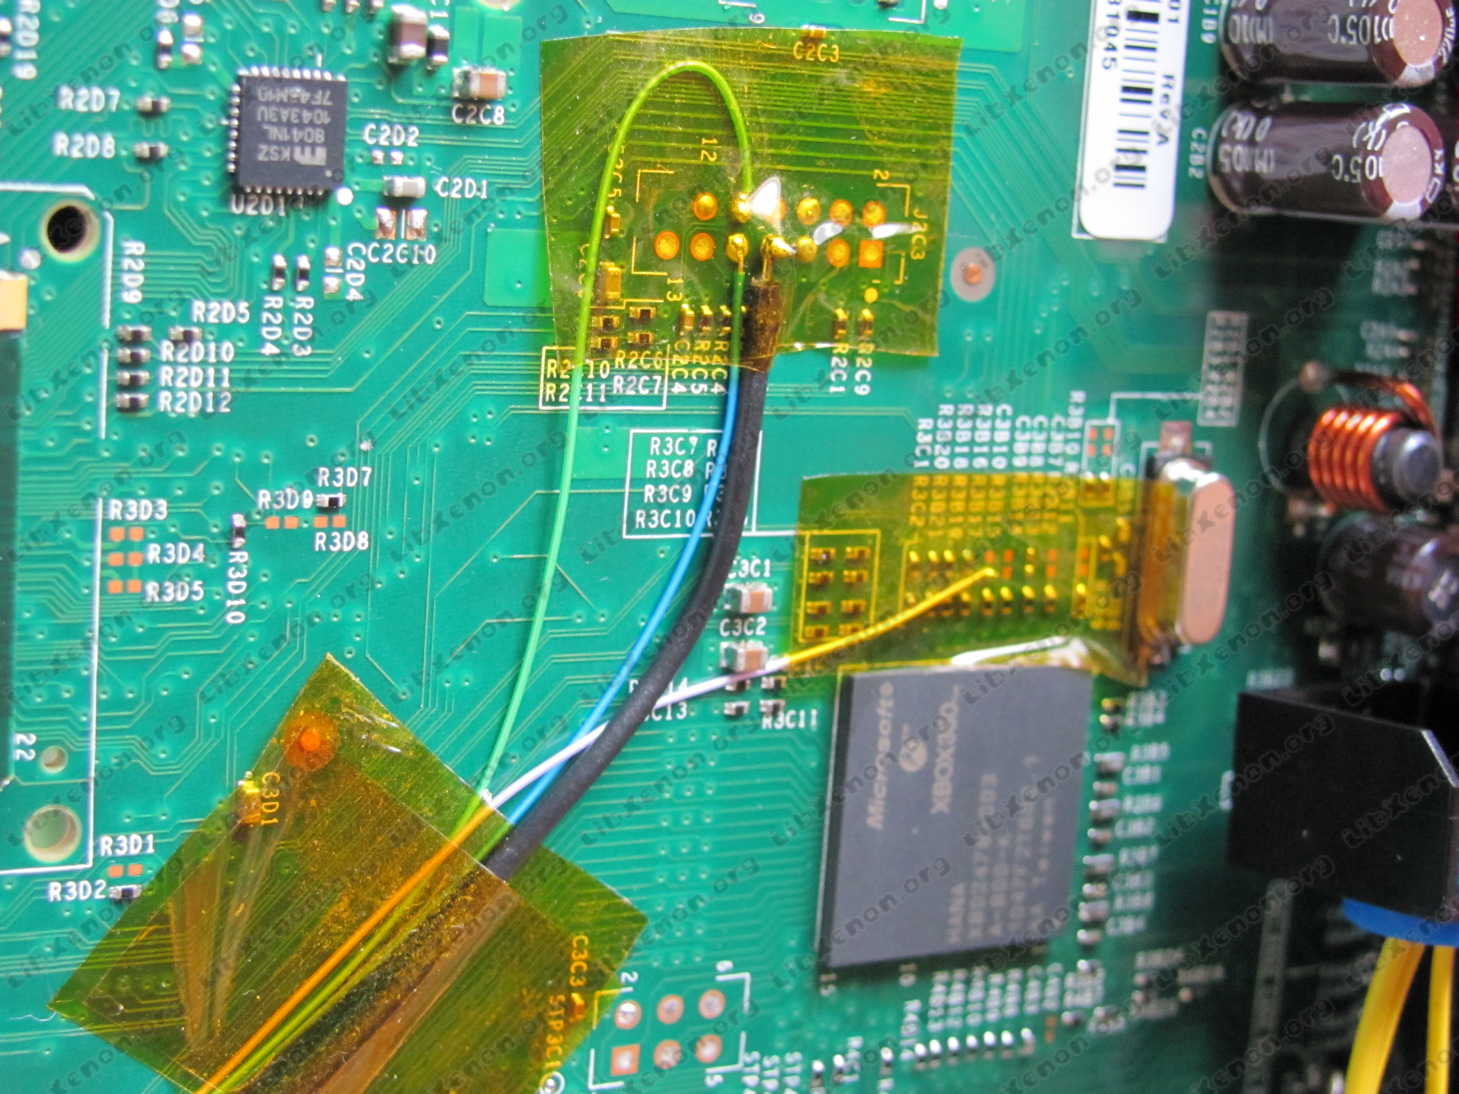
- On the CPLD, remove the Resistor R2 and connect R2's upper pad to R1's lower pad.
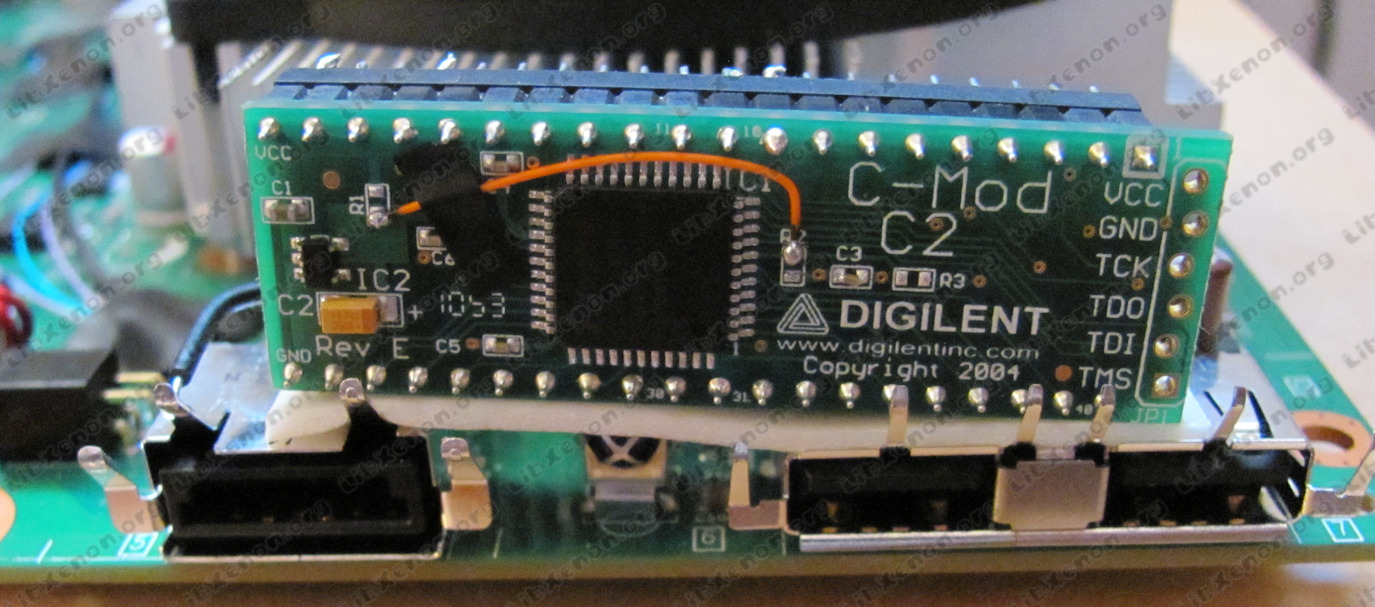
- Place the CPLD on the motherboard like you see on the picture. We recommend to use double coated tape + material to isolate the CPLD.
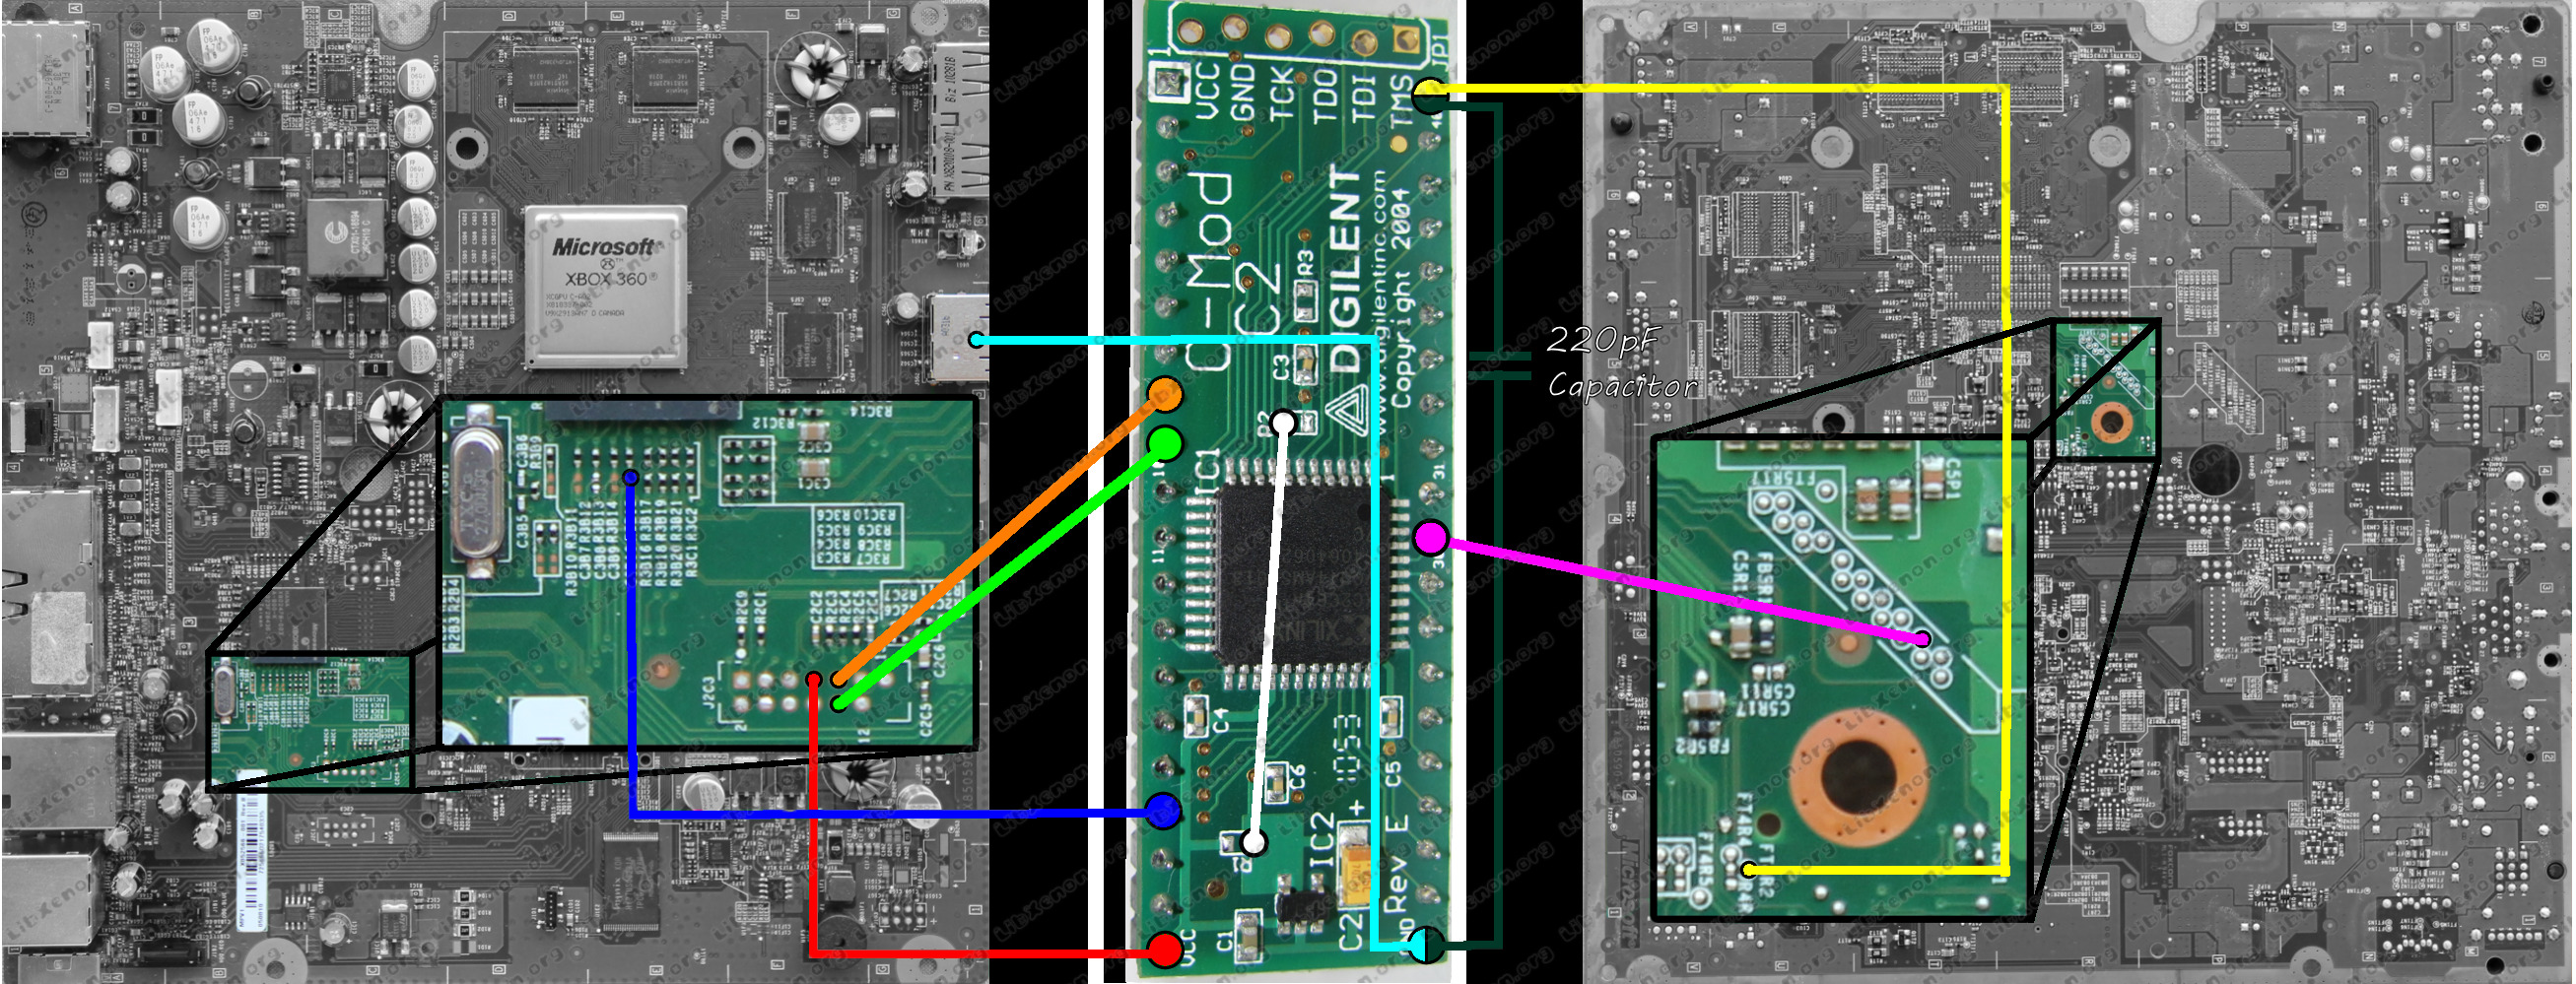
- Use the following diagram to solder all needed connections. It's recommended to use a socket!


ENJOY
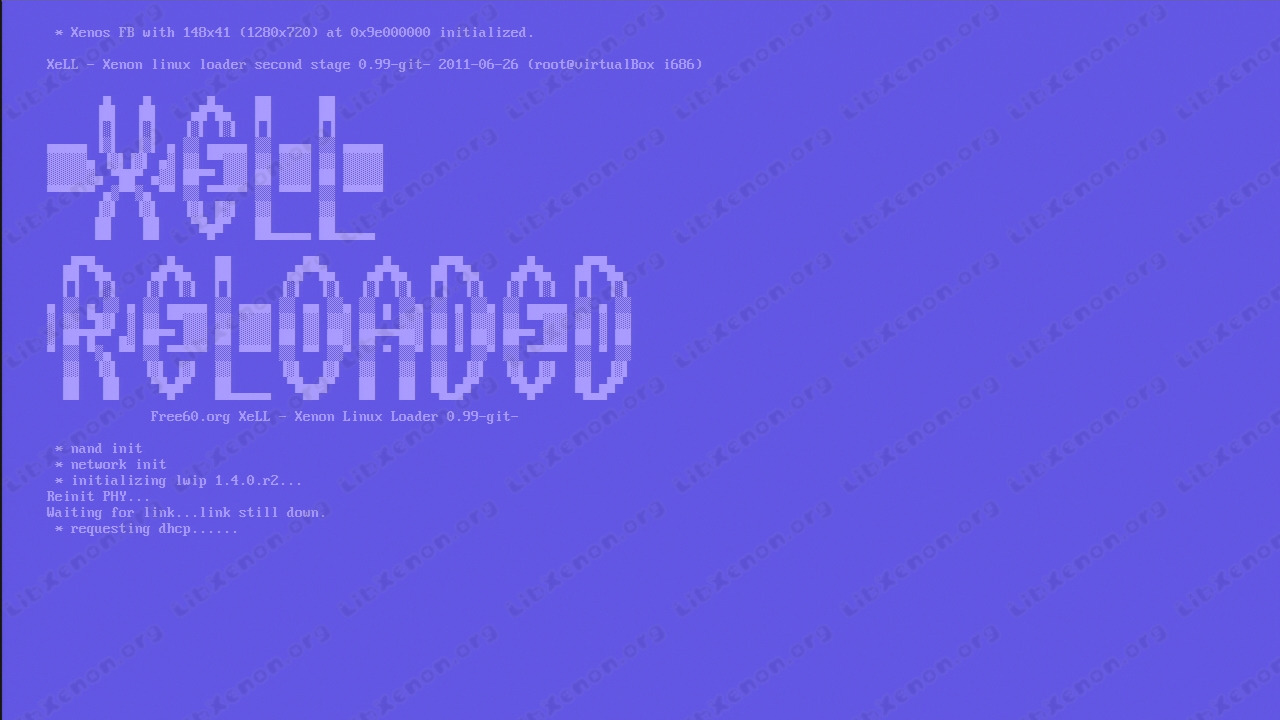
- You can now start your console normally and see XeLL boot within 2 minutes. You can now enjoy unsigned code on your slim.
CREDITS / THANKS
GliGli, Tiros: Reverse engineering and hack development. cOz: Reverse engineering, beta testing. Razkar, tuxuser, Ced2911: beta testing. cjak, Redline99, SeventhSon, tmbinc, anyone I forgot... : Prior reverse engineering and/or hacking work on the 360.